
Lately, I've been working with large data sets in Core Data, and displaying them all at once just wasn’t an option. Each cell involved complex operations, so besides dealing with a massive dataset, I also had heavy rendering. This made the UI sluggish and impractical. ❌
Relying solely on lazy loading(LazyVStack) ⚡ didn’t help either because fetching everything into memory at once was still slow. I needed a better approach.
-> something that could efficiently load data in chunks while keeping the app smooth. That’s where pagination comes in!
👨💻 In this article, I'll walk you through a simpler example of implementing pagination in SwiftUI. We’ll use Swift async/await with the .task(id:) modifier for efficient data fetching and Observation to keep the UI updated seamlessly as the data loads.
You'll learn how to implement batch loading with an indicator at the bottom of the list.
Here is the final result:
I won't go deep into architectural patterns or concurrency issues like race conditions, but here's a simplified diagram showing how we'll structure the code.
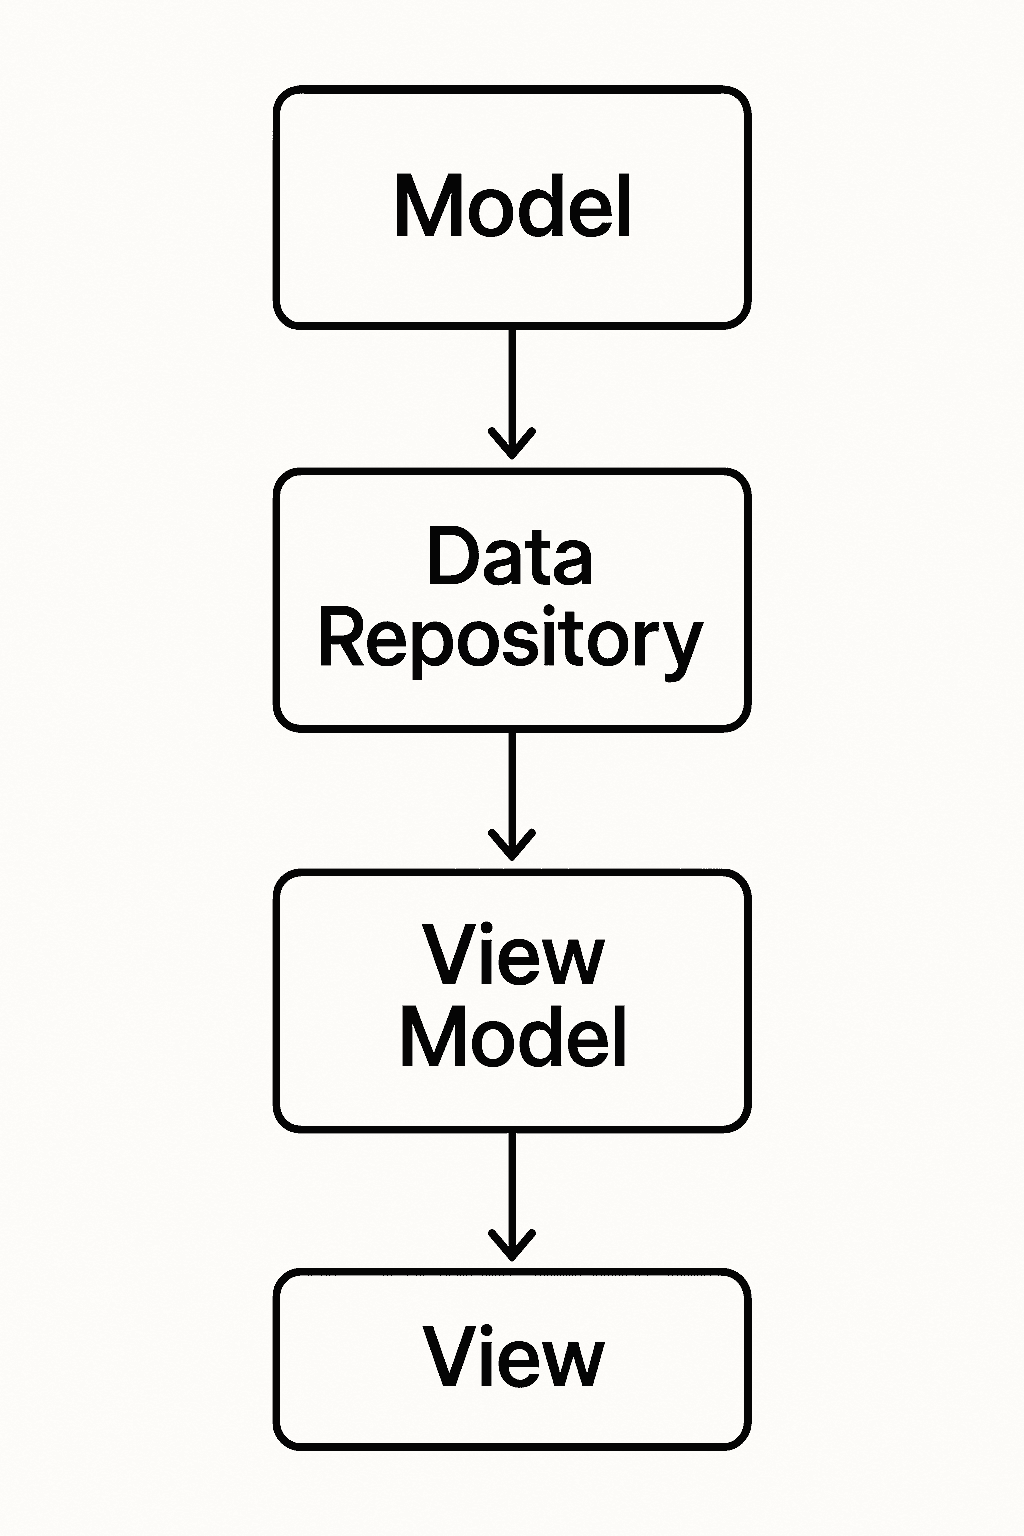
Basically, we'll have a simple Item model, mocked within our data repository. The repository will simulate a delay and handle fetching data in batches based on the last item retrieved.
Here’s what our Model struct will look like:
swiftstruct Item: Identifiable, Equatable {
    let id: String = UUID().uuidString
    let createdDate: Date
    let title: String
    let subtitle: String
    let imageName: String

    static let systemImages = ["star", "heart", "bolt", "cloud", "sun.max", "moon", "flame", "leaf", "bell", "gift",
                               "cart", "house", "car", "airplane", "bicycle", "tram", "bus", "drop.halffull", "bed.double", "gauge",
                               "gamecontroller", "tv", "headphones", "lightbulb", "clock", "camera", "phone", "laptopcomputer", "paintbrush", "wand.and.stars"]

    static let titles = ["Featured", "Popular", "Recommended", "Trending", "New Arrival", "Editor's Pick", "Best Seller", "Limited Edition", "Classic", "Modern"]

    static let subtitles = [
        "A must-have item because it is top-rated by users and consistently gets excellent reviews across the board.",
        "Top-rated by users for its quality and performance, making it a standout choice in the market.",
        "Highly recommended by industry experts and users alike for its exceptional value and reliability.",
        "Customers love this item because of its high performance and reliability, plus it's been recently updated to meet modern needs.",
        "Recently updated with new features, this item has quickly gained popularity among users for its innovation and utility.",
        "Exclusive release, limited edition, and available only for a short time, don’t miss your chance to own it!",
        "Stylish and functional, this item is perfect for any occasion, blending form and function seamlessly for everyday use.",
        "Perfect for any occasion, whether you're dressing up for a special event or adding elegance to your daily routine.",
        "Best value for your money, combining quality, durability, and price in one highly affordable package.",
        "Premium quality, very popular, and highly featured in the latest trends, a must-have for enthusiasts and collectors alike."
    ]

    static var mockedItems: [Item] {
        let items = (0..<150).map { index in
            Item(
                createdDate: Date(),
                title: titles[index % titles.count],
                subtitle: subtitles[index % subtitles.count],
                imageName: systemImages[index % systemImages.count]
            )
        }
        return items.sorted { $0.createdDate > $1.createdDate }
    }
}
To keep things simple, I mocked all the data inside the struct and added a computed property mockedItems that uses titles, systemImages, and subtitles to populate an array of Items.
The Item struct needs to conform to the Identifiable protocol so we can use it in our SwiftUI views, and to Equatable since we’ll need to compare items when determining which was the last one read.
Next, we'll create a DataRepository that will be responsible for providing data to our view model.
swiftclass DataRepository {
    private var items: [Item] = []

    init() {
        items = Item.mockedItems
        items = items.sorted { $0.createdDate > $1.createdDate }
    }

    func fetchNextBatch(from latestItemRead: Item?, batchSize: Int) async -> [Item] {
        try? await Task.sleep(nanoseconds: 2_000_000_000)

        guard let latestItem = latestItemRead, let index = items.firstIndex(where: { $0.id == latestItem.id }) else {
            return Array(items.prefix(batchSize))
        }

        let nextIndex = index + 1
        let endIndex = min(nextIndex + batchSize, items.count)

        guard nextIndex < items.count else {
            return []
        }

        let batch = Array(items[nextIndex..<endIndex])
        return batch
    }

    func getTotalItemsCount() -> Int {
        return items.count
    }
}
Here's what the function does in a nutshell:
-
Simulates a 2-second delay to mimic network latency. ⏱️
-
Checks if there’s a previously read item (latestItemRead); if not, returns the first batch from the original array.
-
If
latestItemReadexists, finds its index and returns the next batch of items starting from the one after it.
Awesome! Next, we’ll hook this up to our view model so it can supply data to the view:
swift@Observable
class LargeDataSetViewModel {
    private let dataRepository: DataRepository
    private let batchSize: Int = 8
    @ObservationIgnored
    private var latestItemRead: Item?
    private(set) var items: [Item] = []
    var triggerFetchTask: Bool = true

    @ObservationIgnored
    private var hasMoreItemsToFetch: Bool {
        let total = getTotalItemsCount()
        return self.items.count < total
    }

    init(dataRepository: DataRepository = DataRepository()) {
        self.dataRepository = dataRepository
    }

    private func getTotalItemsCount() -> Int {
        return dataRepository.getTotalItemsCount()
    }

    func shouldFetchNextBatch(lastVisibleItem: Item) -> Bool {
        if lastVisibleItem == items.last && hasMoreItemsToFetch {
            return true
        }
        return false
    }

    func fetchNextBatch() async {
        let batch = await dataRepository.fetchNextBatch(from: latestItemRead, batchSize: batchSize)
        latestItemRead = batch.last
        await MainActor.run {
            self.items.append(contentsOf: batch)
        }
    }
}
We’re using the Observation framework for state management.
The @ObservationIgnored macro is applied to properties we don’t want to track for changes.
The variable and function names should be clear enough to describe their purpose, but here's a quick summary:
-
We inject the data repository into the initializer.
-
Mini helper functions provide the total count of items and check if we need to trigger another batch fetch.
-
Finally, we have the fetch function itself, which updates the UI on the
MainActoras expected.
-> Now, let’s dive into the main attraction of this post: the UI part where the lazy loading happens.
swiftstruct LargeDataSetView: View {
    @State private var viewModel = LargeDataSetViewModel()
    var body: some View {
        ScrollView {
            collectionTitle
            LazyVStack(alignment: .leading, spacing: 16) {
                ForEach(viewModel.items) { item in
                    configureItemCell(item: item)
                        .onAppear {
                            if viewModel.shouldFetchNextBatch(lastVisibleItem: item) {
                                viewModel.triggerFetchTask = true
                            }
                        }
                }
                if viewModel.triggerFetchTask {
                    loadingProgress
                }
            }
        }
        .contentMargins(20, for: .scrollContent)
        .task(id: viewModel.triggerFetchTask) {
            guard viewModel.triggerFetchTask else { return }
            await viewModel.fetchNextBatch()
            viewModel.triggerFetchTask = false
        }
    }
}
We initialized our view model for data fetching, then used a basic ScrollView with a LazyVStack and a ForEach to iterate over the data source.
ⓘ The LazyVStack only loads views as they come into view, improving performance by reducing memory usage and speeding up rendering, especially with large data sets.
We use the onAppear modifier on each ItemCell to check if it's the last item. If so, it updates an observed boolean in our view model, triggering a task based on that item's ID.
swift.task(id: viewModel.triggerFetchTask) {
    guard viewModel.triggerFetchTask else { return }
    await viewModel.fetchNextBatch()
    viewModel.triggerFetchTask = false
}
The .task modifier simplifies things by automatically managing cancellation. We trigger it using the boolean when a new batch is needed, and it automatically cancels itself under the hood.
To stay organized, I’ve declared the smaller UI components in an extension of LargeDataSetView, keeping the code modular by breaking it into smaller, manageable units.
swiftextension LargeDataSetView {
    private func configureItemCell(item: Item) -> some View {
        VStack(alignment: .leading) {
            HStack(alignment: .top, spacing: 16) {
                Image(systemName: item.imageName)
                    .font(.title2)
                    .frame(width: 30)
                VStack(alignment: .leading) {
                    Text(item.title)
                        .font(.title2)
                    Text(item.subtitle)
                        .font(.callout)
                }
                Spacer()
            }
            Divider()
        }
    }

    private var collectionTitle: some View {
        HStack {
            Text("Items")
                .font(.title)
                .fontWeight(.semibold)
            Spacer()
        }
        .padding(.bottom)
    }

    private var loadingProgress:  some View {
        HStack {
            Spacer()
            ProgressView()
                .progressViewStyle(CircularProgressViewStyle())
                .padding(.top, 10)
            Spacer()
        }
    }
}
Now, the full code is provided to achieve the result demonstrated in the demo at the beginning of the post.